Difference between revisions of "Adjustments"
| Line 1: | Line 1: | ||
=About= | =About= | ||
| + | <pre> | ||
This page discusses some of the ways that you are able to make an adjustment to pay and invoicing data that has been entered and/or processed in PinvoiceR. | This page discusses some of the ways that you are able to make an adjustment to pay and invoicing data that has been entered and/or processed in PinvoiceR. | ||
| − | + | </pre> | |
=Making adjustments '''before''' batches are written to the General Ledger= | =Making adjustments '''before''' batches are written to the General Ledger= | ||
Revision as of 06:45, 23 January 2018
Contents
About
This page discusses some of the ways that you are able to make an adjustment to pay and invoicing data that has been entered and/or processed in PinvoiceR.
Making adjustments before batches are written to the General Ledger
Editing Transaction Rows
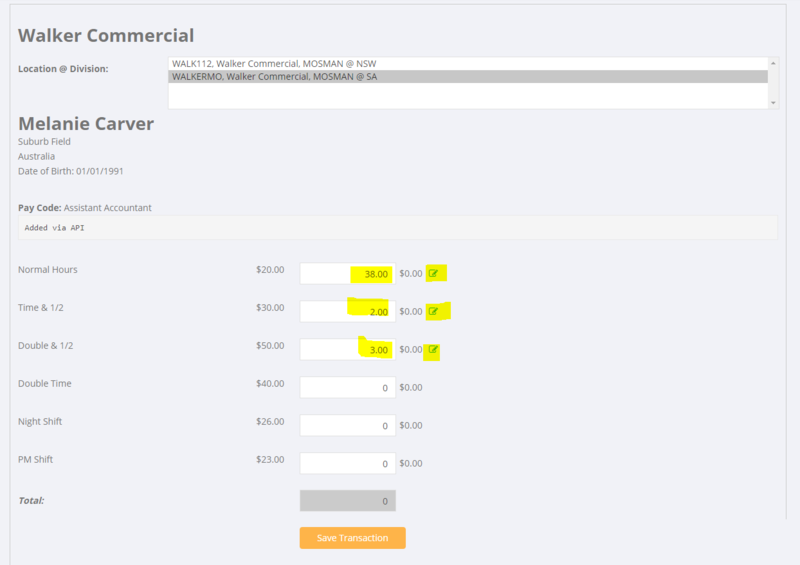
The easiest way to make an adjustment to a pay and/or a charge is if you have entered the hours from an order is to edit hours from the orders screen.
To do this - go to the Orders screen and click on the name of the person that you want to edit - ie they will have already had hours entered for them. On the following screen click the Next button. This will bring you to a summary of the hours that have been previously entered.
Here you can adjust the quantities in the relevant pay code items & days - eg
- to change 38 hours to 36 hours, type in 36
- to change 38 hours to 0 hours, type in 0
- to change 0 hours to 5 hours, type in 5
- to change the transaction type from NORMAL to DO NOT CHARGE CLIENT will only pay the employee
Make the changes you need and click the Save Transaction button.
Note: - the pencil note icon next to the hours is a link to the Edit Pay Rows for that transaction - see next article for more info.
Edit Pay Rows
Making adjustments after batches have been written to the General Ledger
Example - Changed the Bank File when uploading pays
There may be times when you go to upload a bank file and the upload process triggers an error - eg the bank details for someone are incorrect. Also you may find out after processing the pays (before uploading the bank file) that you do not need to pay a person on that file.
In both of these theoretical examples you decide to delete a record from the bank file and so not pay a person who has been 'paid' in PinvoiceR. In some instances you will go back and manually pay the person (eg they provide you with their correct bank details) and in other instances you will not be paying that person at all.
In the instance that you are not paying the person at all it is imperative that you create a journal to correct the data in PinvoiceR.
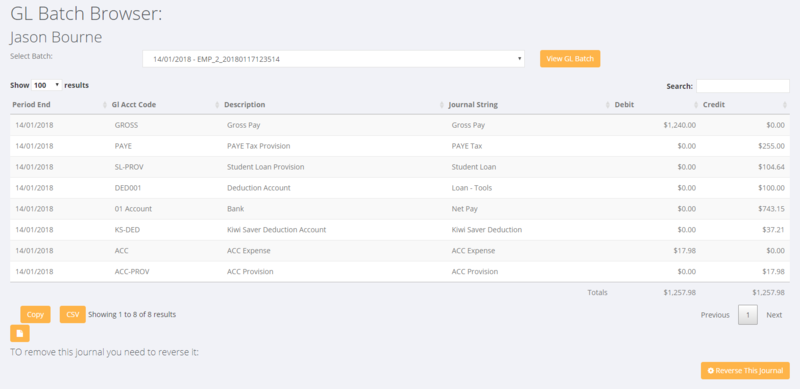
The easiest way to do that is to find the employee then click on the GL Batches button.
From here, select the relevant pay batch (period ending) and click the View Batch button.
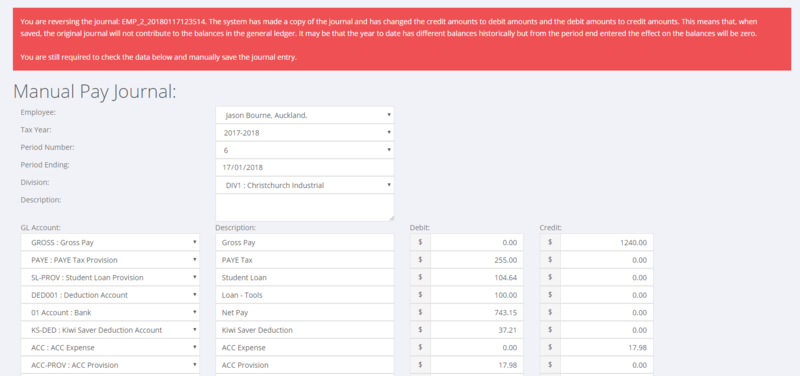
Next you click on the Reverse This Journal button. This will bring up the original full journal for that batch and confirm that you wish to reverse it - click the Save Journal button to create the reversal jorunal.
Example - Need to Adjust an employee's Tax after processing pays
In this example you are advised, after processing and paying an employee that their tax code was incorrect and they we over taxed so you need to be able to refund the over tax amount.
To do this, go to the employee record and click on on the GL Batches button.
From here, select the relevant pay batch (period ending) and click the View Batch button.
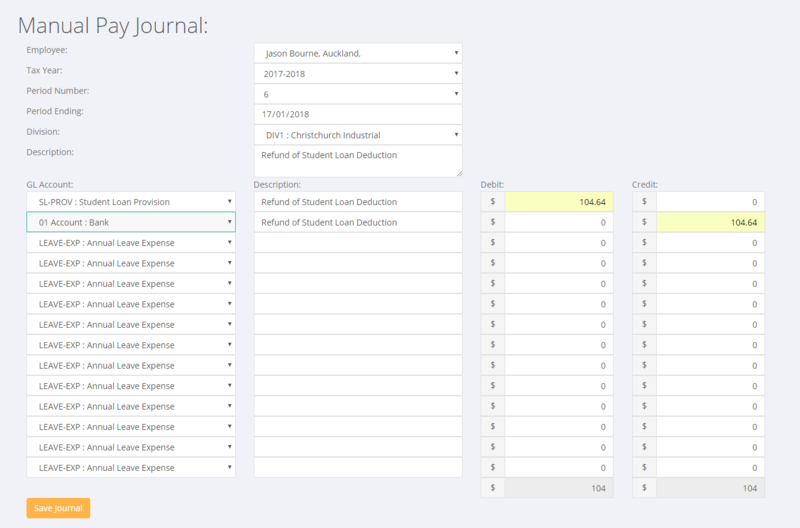
Next you right click (to open in a new window) on the + Add Manual Journal button. This will bring up a new window with a blank manual journal for the employee. By clicking between the two screens (ie the journal detail and the manual journal screen) you can complete the journal adjustments needed - eg to Reverse an over tax amount for Student Loan you would need to enter the following;
- Check Employee Name (comes from the employee you originally clicked on)
- Check Tax Year (will default to the current year)
- Check Period Number (will default to current period)
- Check Period Ending (defaults to today's date)
- Check Division (defaults to the Division set against the employee)
- Enter in the relevant journal lines (journal will not post unless it balances)
When complete click the Save Journal button.
The example above will create a manual pay and because it is for an amount to be refunded the next step would be to proceed to Download Bank File and pay the employee through your bank system. A payslip is generated for the manual pay.


