Difference between revisions of "Paying Employees"
| (10 intermediate revisions by the same user not shown) | |||
| Line 1: | Line 1: | ||
==About== | ==About== | ||
| − | It is important to note that there are a number of methods used to pay employees and these will depend on how your integration with your front end system (RecruitOnline | + | It is important to note that there are a number of methods used to pay employees and these will depend on how your integration with your front end system (RecruitOnline) is configured. In many cases, hours will be captured via an online portal for electronic timesheets or entered manually and will flow from the front end system into PinvoiceR. |
| − | ==Hours | + | ==Hours imported from a Front End System== |
To process hours that have already been entered and exported from your front end system click on <kbd>Pay Employee</kbd> - the hours waiting to be processed are shown; | To process hours that have already been entered and exported from your front end system click on <kbd>Pay Employee</kbd> - the hours waiting to be processed are shown; | ||
| Line 12: | Line 12: | ||
Select the hours that you wish to process (note there is a select all option and you can also sort by heading should you only wish to process a certain range of hours only) and click the <kbd>Process Hours</kbd> button. | Select the hours that you wish to process (note there is a select all option and you can also sort by heading should you only wish to process a certain range of hours only) and click the <kbd>Process Hours</kbd> button. | ||
| − | The next stage is to go to <kbd>Payroll</kbd> > <kbd>Open Batches</kbd> & click on the batch you wish to review/process. | + | The next stage is to go to <kbd>Payroll</kbd> > <kbd>[[Open Batches]]</kbd> & click on the batch you wish to review/process. |
| + | ==Hours Pre-Populating - Daily Bookings== | ||
| + | |||
| + | For clients using Daily Bookings in RecruitOnline, the calculation of hours will pre-populate in the hours entry screen in Orders. | ||
| + | |||
| + | The way that this works is that it will calculate the hours worked from the start and finish time and also automatically add a 30min break if the total hours are over 5.5 hours. It will split into day, afternoon and night shift but not determine overtime rates. | ||
| + | |||
| + | It is upto the payroll person entering the hours to confirm the hours by editing (if required) and clicking the <kbd>Save Hours for Order</kbd> button. | ||
| + | |||
| + | [[File:PinvoiceR_Hours_Prepopulating.png|800px]] | ||
==Entering Hours directly in PinvoiceR== | ==Entering Hours directly in PinvoiceR== | ||
| Line 34: | Line 43: | ||
| − | Then enter the relevant hours for each of the days/week for each of the pay code items. | + | Then enter the relevant hours for each of the days/week for each of the pay code items and then select the transaction type (NORMAL etc) and click the <kbd>Save Period</kbd> button. |
[[File:enter_hours_2.jpg]] | [[File:enter_hours_2.jpg]] | ||
| − | ==Things to note | + | ==Things to note== |
* If you want to both pay and charge for the hours that you are entering then select "NORMAL" in the drop down option selection. | * If you want to both pay and charge for the hours that you are entering then select "NORMAL" in the drop down option selection. | ||
| Line 45: | Line 54: | ||
* If you want to charge and not pay then select the "DO NOT PAY EMPLOYEE" from the drop down option selection. | * If you want to charge and not pay then select the "DO NOT PAY EMPLOYEE" from the drop down option selection. | ||
* You can enter in negative hours - this will have the effect of deducting pay in a pay that the total (inclusive of the negative amount) is greater than zero and will also appear as a credit on the invoice. | * You can enter in negative hours - this will have the effect of deducting pay in a pay that the total (inclusive of the negative amount) is greater than zero and will also appear as a credit on the invoice. | ||
| + | |||
| + | ==Related Pages== | ||
| + | |||
| + | * [[Hours Entry Format]] | ||
| + | * [[Orders]] | ||
| + | * [[Hours Import]] | ||
| + | * [[Employee Deductions]] | ||
Latest revision as of 06:28, 28 May 2019
Contents
About
It is important to note that there are a number of methods used to pay employees and these will depend on how your integration with your front end system (RecruitOnline) is configured. In many cases, hours will be captured via an online portal for electronic timesheets or entered manually and will flow from the front end system into PinvoiceR.
Hours imported from a Front End System
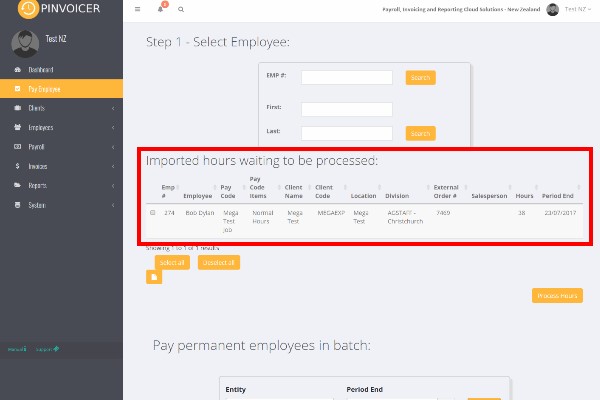
To process hours that have already been entered and exported from your front end system click on Pay Employee - the hours waiting to be processed are shown;
Select the hours that you wish to process (note there is a select all option and you can also sort by heading should you only wish to process a certain range of hours only) and click the Process Hours button.
The next stage is to go to Payroll > Open Batches & click on the batch you wish to review/process.
Hours Pre-Populating - Daily Bookings
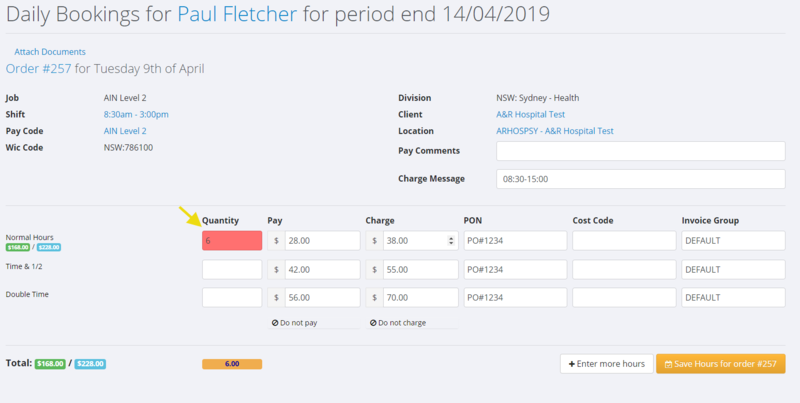
For clients using Daily Bookings in RecruitOnline, the calculation of hours will pre-populate in the hours entry screen in Orders.
The way that this works is that it will calculate the hours worked from the start and finish time and also automatically add a 30min break if the total hours are over 5.5 hours. It will split into day, afternoon and night shift but not determine overtime rates.
It is upto the payroll person entering the hours to confirm the hours by editing (if required) and clicking the Save Hours for Order button.
Entering Hours directly in PinvoiceR
It is also possible to enter hours directly into PinvoiceR and this can be done either from Orders (previously created) or by manually selecting and employee, pay code and client.
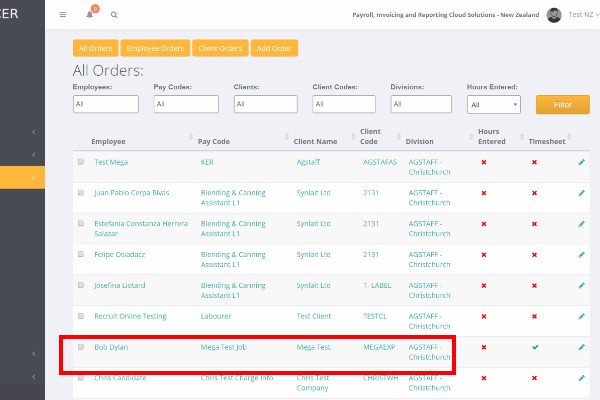
To enter hours from an order - click on Payroll > Orders
To enter hours - click on the name of the person that you wish to enter hours for,
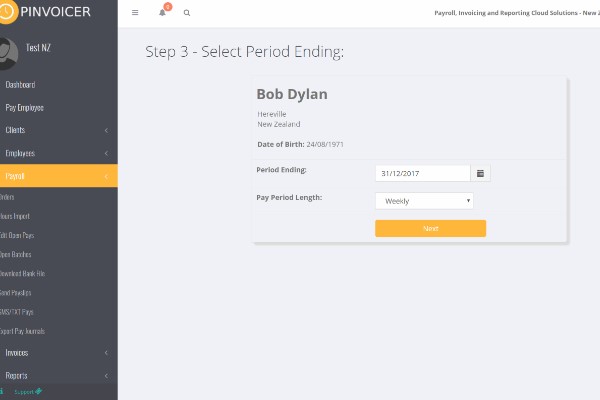
Then select the week ending date for the hours that you are entering (note - it will default to the current week ending date for the week you are processing). Click the Next button.
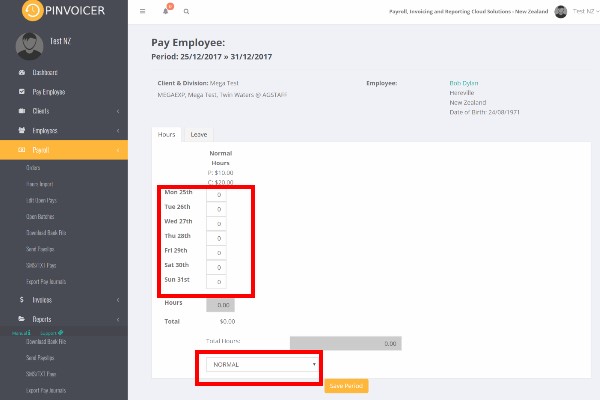
Then enter the relevant hours for each of the days/week for each of the pay code items and then select the transaction type (NORMAL etc) and click the Save Period button.
Things to note
- If you want to both pay and charge for the hours that you are entering then select "NORMAL" in the drop down option selection.
- If you want to pay and not charge then select "DO NOT CHARGE CLIENT" from the drop down option selection.
- If you want to charge and not pay then select the "DO NOT PAY EMPLOYEE" from the drop down option selection.
- You can enter in negative hours - this will have the effect of deducting pay in a pay that the total (inclusive of the negative amount) is greater than zero and will also appear as a credit on the invoice.
