Difference between revisions of "Reimbursements"
(Created page with "=About= The Reimbursements process in PinvoiceR is used to manage the payment of reimbursements (eg expenses) to employees. =How to use= From the main menu, click on the <...") |
|||
| (5 intermediate revisions by the same user not shown) | |||
| Line 7: | Line 7: | ||
From the main menu, click on the <kbd>Payroll</kbd> and <kbd>Reimbursements</kbd> links. | From the main menu, click on the <kbd>Payroll</kbd> and <kbd>Reimbursements</kbd> links. | ||
| + | |||
===Add A Reimbursement=== | ===Add A Reimbursement=== | ||
| Line 22: | Line 23: | ||
* GST - indicate if the total amount include GST or not | * GST - indicate if the total amount include GST or not | ||
* GL Account to allocate the expense to* | * GL Account to allocate the expense to* | ||
| + | |||
Click the <kbd>Add</kbd> button. | Click the <kbd>Add</kbd> button. | ||
| + | |||
| + | |||
[[File:Add_Reimbursement.png |800px]] | [[File:Add_Reimbursement.png |800px]] | ||
| Line 34: | Line 38: | ||
[[File:Unapproved_Reimbursement.png |800px]] | [[File:Unapproved_Reimbursement.png |800px]] | ||
| − | |||
===Pay a Reimbursement=== | ===Pay a Reimbursement=== | ||
Click on the Approved tab and select the reimbursements that you wish to pay. Then choose the payment batch date and click the <kbd>Create batch with selected</kbd> button. | Click on the Approved tab and select the reimbursements that you wish to pay. Then choose the payment batch date and click the <kbd>Create batch with selected</kbd> button. | ||
| + | |||
This process will create a bank file for the reimbursements to be uploaded into your banking system. To access the bank file - from the main menu click on the <kbd>Payroll</kbd> and <kbd>Download Bank File</kbd> links. | This process will create a bank file for the reimbursements to be uploaded into your banking system. To access the bank file - from the main menu click on the <kbd>Payroll</kbd> and <kbd>Download Bank File</kbd> links. | ||
| + | |||
| + | |||
Then click on the <kbd>Reimbursements Bank File</kbd> button. | Then click on the <kbd>Reimbursements Bank File</kbd> button. | ||
| + | |||
| + | |||
[[File:Reimbursements_Bank_File.png |800px]] | [[File:Reimbursements_Bank_File.png |800px]] | ||
| Line 49: | Line 57: | ||
Then select the batch(es) that you want to download and click the <kbd>Select Batches</kbd> button. | Then select the batch(es) that you want to download and click the <kbd>Select Batches</kbd> button. | ||
| + | |||
| + | |||
[[File:Download_Reimbursements_Bank_File.png |800px]] | [[File:Download_Reimbursements_Bank_File.png |800px]] | ||
| − | Then set the date for payment ( | + | |
| + | |||
| + | Then set the date for payment (pay date) and file name and (depending on which bank file format you need) choose either the <kbd>Download Batches</kbd> or <kbd>Download MT9 Format</kbd> button. | ||
Then use the downloaded file in your banking system to pay the reimbursements. | Then use the downloaded file in your banking system to pay the reimbursements. | ||
| + | |||
| + | |||
[[File:Download_Bank_File_Format.png |800px]] | [[File:Download_Bank_File_Format.png |800px]] | ||
| + | ===Export Reimbursement Batch to GL=== | ||
| + | |||
| + | Once you have created the reimbursement batch you will ultimately need to export the batch (journal) into your accounting system. For reimbursement batches, click on the <kbd>Payroll</kbd> and <kbd>Export Pay Journals</kbd> links. | ||
| + | |||
| + | Then click on the reimbursement batch to open and click on the <kbd>Download Journal CSV</kbd> to create a csv file to import into your accounting system. | ||
| + | [[File:Export_batch_to_GL.png |800px]] | ||
=Related Pages= | =Related Pages= | ||
| + | |||
| + | * [[Chart of Accounts Editor]] | ||
Latest revision as of 06:28, 13 August 2020
Contents
About
The Reimbursements process in PinvoiceR is used to manage the payment of reimbursements (eg expenses) to employees.
How to use
From the main menu, click on the Payroll and Reimbursements links.
Add A Reimbursement
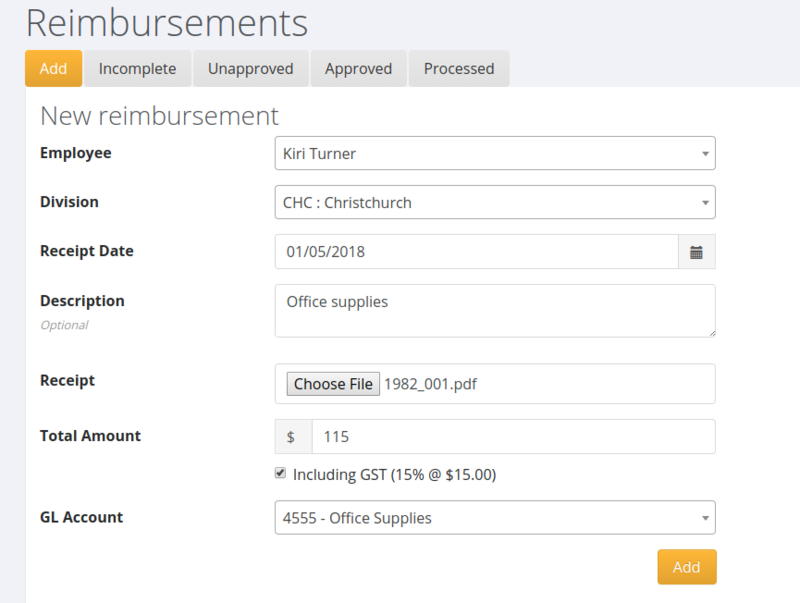
The first screen you see has the ability to add in the details for a reimbursement;
Here you need to enter;
- Employee Name
- Division
- Receipt Date
- Description (optional)
- Upload a copy of the receipt (optional)
- Total Amount of Reimbursement
- GST - indicate if the total amount include GST or not
- GL Account to allocate the expense to*
Click the Add button.
- Note - you may need to add in a relevant GL account in order to record the expense correctly - see Chart of Accounts Editor
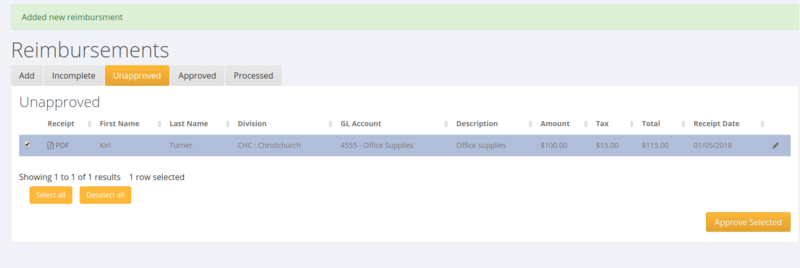
Once you have added the reimbursement it will appear in the Unapproved Tab. From here, select the reimbursements you wish to approve and click the Approve Selected button.
Pay a Reimbursement
Click on the Approved tab and select the reimbursements that you wish to pay. Then choose the payment batch date and click the Create batch with selected button.
This process will create a bank file for the reimbursements to be uploaded into your banking system. To access the bank file - from the main menu click on the Payroll and Download Bank File links.
Then click on the Reimbursements Bank File button.
Then select the batch(es) that you want to download and click the Select Batches button.
Then set the date for payment (pay date) and file name and (depending on which bank file format you need) choose either the Download Batches or Download MT9 Format button.
Then use the downloaded file in your banking system to pay the reimbursements.
Export Reimbursement Batch to GL
Once you have created the reimbursement batch you will ultimately need to export the batch (journal) into your accounting system. For reimbursement batches, click on the Payroll and Export Pay Journals links.
Then click on the reimbursement batch to open and click on the Download Journal CSV to create a csv file to import into your accounting system.


