Difference between revisions of "Current Transactions"
(Created page with "=About= Current transactions show the draft invoices created from the hours entry process. Use the Period & Division filters to select those draft invoices you wish to approv...") |
|||
| (29 intermediate revisions by the same user not shown) | |||
| Line 1: | Line 1: | ||
=About= | =About= | ||
| − | Current transactions show the draft invoices created from the hours entry process. Use the Period & | + | Current transactions show the draft invoices created from the hours entry process. Use the Period & Open/Closed filters to select those draft invoices you wish to approve. |
=How to Use= | =How to Use= | ||
| + | |||
| + | |||
| + | ==View Open/Closed Transactions== | ||
| + | |||
Click on the <kbd>Invoices</kbd> and then the <kbd>Current Transactions</kbd> links to access. | Click on the <kbd>Invoices</kbd> and then the <kbd>Current Transactions</kbd> links to access. | ||
| − | |||
| − | The screen | + | The screen will default to the most recent period ending and show Open transactions (if there are any) or Closed ones. |
| + | |||
| + | |||
| + | When looking at the Current Transactions report, Open transactions are those that have been entered and the employees have not yet been paid (ie the batch has not been processed). Closed transactions are those where the batch has been processed - or if there is not a pay associated with the invoice (ie transactions that are charge only will go straight into Closed in the Current Transactions report). | ||
| + | |||
| + | |||
| + | Below are Open transactions; | ||
| + | |||
| + | |||
| + | [[File:PinvoiceR_-_Current_Transactions_Open.png |800px]] | ||
| + | |||
| + | |||
| + | |||
| + | Below are Closed transactions; | ||
| + | |||
| + | |||
| + | [[File:PinvoiceR_-_Current_Transactions_Closed.png |800px]] | ||
| + | |||
| + | |||
| + | |||
| + | |||
| + | As mentioned above - draft invoices are grouped by period end and these are selected from the ''Change Period'' dropdown box in the top left of the screen. | ||
| + | |||
| + | ====View Uninvoiced Transactions==== | ||
| + | |||
| + | |||
| + | To see all Uninvoiced Transactions (irrespective of the period end) select ''Uninvoiced Transactions'' dropdown box in the top left of the screen. Again, use the Open or Closed tab to filter between the two types. | ||
| + | |||
| + | |||
| + | |||
| + | [[File:PinvoiceR_-_Uninvoiced_Transactions.png |800px]] | ||
| + | |||
| + | ==Approve An Invoice== | ||
| + | |||
| + | Prior to sending an invoice it needs to be approved. | ||
| + | |||
| + | To '''approve a single invoice''' click on the company or employee name (or Approve button) when looking at the Current Transactions. | ||
| + | |||
| + | Once you have clicked on it, the next screen shows you all of the lines on that invoice - ie by clicking on any line from the Current Transactions screen you will see a draft invoice with all of the relevant invoice lines on it. | ||
| + | |||
| + | The way that a draft invoice is created is that the system will look for all entered transactions for that billing location and that period ending. So by having [[Orders]] with the same [[Client Location]] it will automatically group transaction invoice rows together. If the order also has a Purchase Order number - eg different Orders have different purchase order numbers, then the system will create an invoice for each of the purchase orders. | ||
| + | |||
| + | |||
| + | To approve an invoice, first check that all of the invoice details are correct and then confirm that the Approve Invoice screen has the correct details (eg enter a Purchase Order # if you need one on the invoice and it has not been entered on the order already - or [[Edit Invoice Rows]] if you need to make adjustments) - then click the <kbd>Approve Invoice</kbd> button. | ||
| + | |||
| + | |||
| + | |||
| + | [[File:PinvoiceR_-_Approve_Invoice.png |800px]] | ||
| + | |||
| + | |||
| + | |||
| + | Once approved, you can then email by clicking the ''Email PDF'' button. You can also attach documents (if not already attached when entering hours) but clicking on the <kbd>Attach Documents</kbd> button. If using online timesheets then these are attached but clicking the <kbd>Import Timesheets</kbd> button. | ||
| + | |||
| + | |||
| + | |||
| + | [[File:PinvoiceR_-_View_Approved_Invoice.png |800px]] | ||
| + | |||
| + | |||
| + | |||
| + | |||
| + | ==To Approve All Invoices== | ||
| + | |||
| + | |||
| + | |||
| + | To '''bulk approve invoices''' - from the Current Transactions page - click on the <kbd>Approve All</kbd> button. The next screen allows for the following levels of invoices to be approved or approved and sent - if you just want to approve all at the entity level - click the <kbd>Approve</kbd> button or if you want to approve all and send click the <kbd>Approve & Send</kbd> button. | ||
| + | |||
| + | |||
| + | |||
| + | |||
| + | [[File:PinvoiceR_-_Approve_All_Invoices_Entity_Level.png|800px]] | ||
| + | |||
| + | |||
| + | By clicking on the arrow down icon you can split the draft invoices down to each level. | ||
| + | |||
| + | ''Client Group Level''' | ||
| + | |||
| + | |||
| + | [[File:PinvoiceR_-_Approve_All_Invoices_Client_Group_Level.png |800px]] | ||
| + | |||
| + | |||
| + | |||
| + | ''Client Level'' | ||
| + | |||
| + | |||
| + | [[File:PinvoiceR_-_Approve_All_Invoices_Client_Level.png |800px]] | ||
| + | |||
| + | |||
| + | |||
| + | ''Client Billing Location Level'' | ||
| + | |||
| + | |||
| + | [[File:PinvoiceR_-_Approve_All_Invoices_Client_Billing_Location_Level.png |800px]] | ||
| + | |||
| + | |||
| + | ''Draft Invoice Level'' | ||
| + | [[File:PinvoiceR_-_Approve_All_Invoices_Client_Billing_Draft_Invoice_Level.png |800px]] | ||
=Related Pages= | =Related Pages= | ||
| + | * [[Edit Invoice Rows]] | ||
| + | * [[Invoices]] | ||
| + | * [[Invoice Report]] | ||
| + | * [[Add Invoice]] | ||
| + | * [[Credit Notes]] | ||
| + | * [[Export Invoices]] | ||
| + | * [[Batch Invoices Download]] | ||
| + | * [[Receipting]] | ||
Latest revision as of 00:51, 21 July 2020
Contents
About
Current transactions show the draft invoices created from the hours entry process. Use the Period & Open/Closed filters to select those draft invoices you wish to approve.
How to Use
View Open/Closed Transactions
Click on the Invoices and then the Current Transactions links to access.
The screen will default to the most recent period ending and show Open transactions (if there are any) or Closed ones.
When looking at the Current Transactions report, Open transactions are those that have been entered and the employees have not yet been paid (ie the batch has not been processed). Closed transactions are those where the batch has been processed - or if there is not a pay associated with the invoice (ie transactions that are charge only will go straight into Closed in the Current Transactions report).
Below are Open transactions;
Below are Closed transactions;
As mentioned above - draft invoices are grouped by period end and these are selected from the Change Period dropdown box in the top left of the screen.
View Uninvoiced Transactions
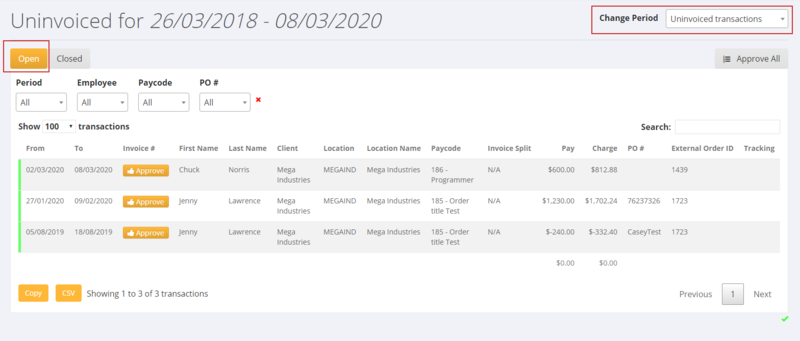
To see all Uninvoiced Transactions (irrespective of the period end) select Uninvoiced Transactions dropdown box in the top left of the screen. Again, use the Open or Closed tab to filter between the two types.
Approve An Invoice
Prior to sending an invoice it needs to be approved.
To approve a single invoice click on the company or employee name (or Approve button) when looking at the Current Transactions.
Once you have clicked on it, the next screen shows you all of the lines on that invoice - ie by clicking on any line from the Current Transactions screen you will see a draft invoice with all of the relevant invoice lines on it.
The way that a draft invoice is created is that the system will look for all entered transactions for that billing location and that period ending. So by having Orders with the same Client Location it will automatically group transaction invoice rows together. If the order also has a Purchase Order number - eg different Orders have different purchase order numbers, then the system will create an invoice for each of the purchase orders.
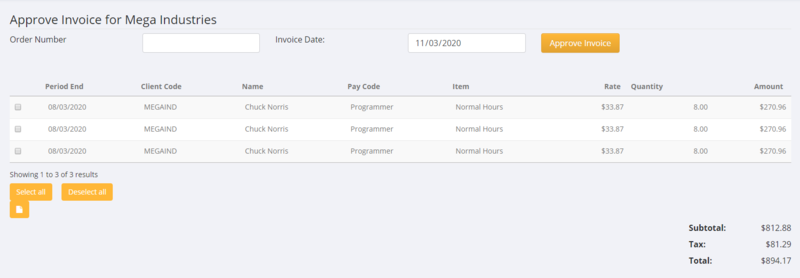
To approve an invoice, first check that all of the invoice details are correct and then confirm that the Approve Invoice screen has the correct details (eg enter a Purchase Order # if you need one on the invoice and it has not been entered on the order already - or Edit Invoice Rows if you need to make adjustments) - then click the Approve Invoice button.
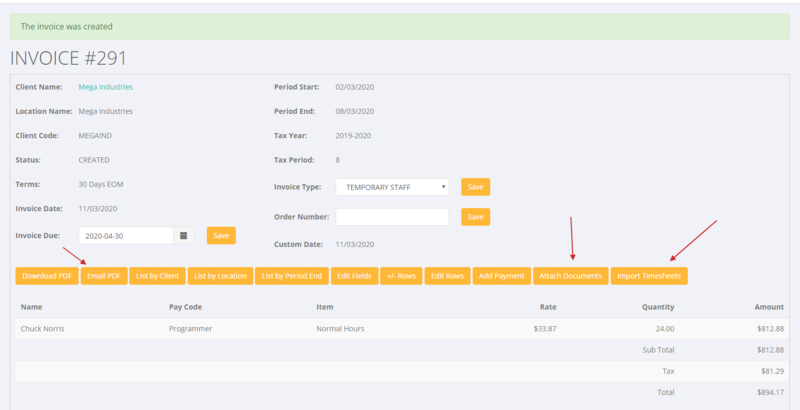
Once approved, you can then email by clicking the Email PDF button. You can also attach documents (if not already attached when entering hours) but clicking on the Attach Documents button. If using online timesheets then these are attached but clicking the Import Timesheets button.
To Approve All Invoices
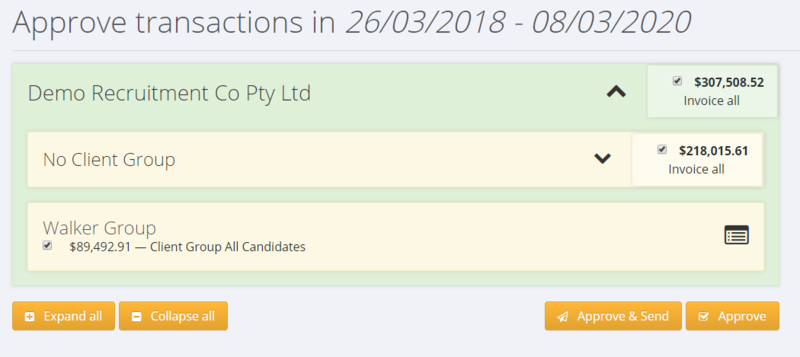
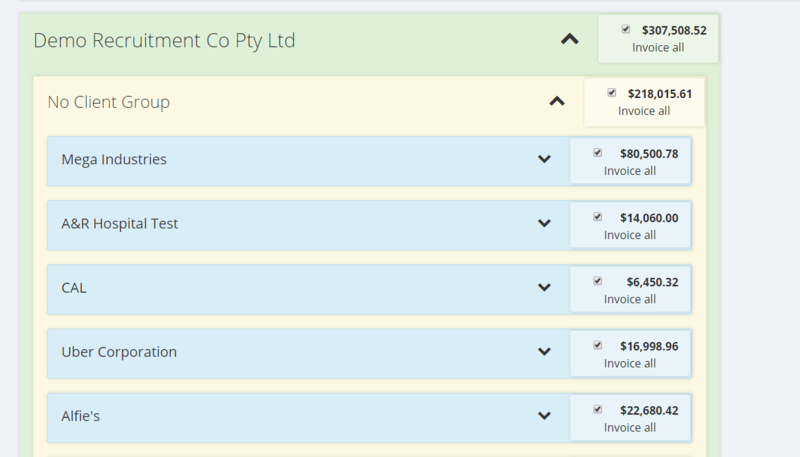
To bulk approve invoices - from the Current Transactions page - click on the Approve All button. The next screen allows for the following levels of invoices to be approved or approved and sent - if you just want to approve all at the entity level - click the Approve button or if you want to approve all and send click the Approve & Send button.
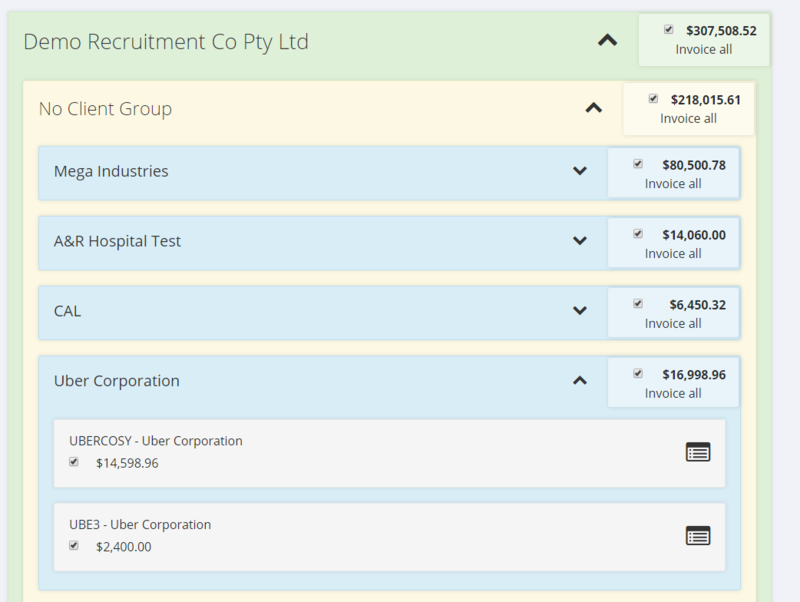
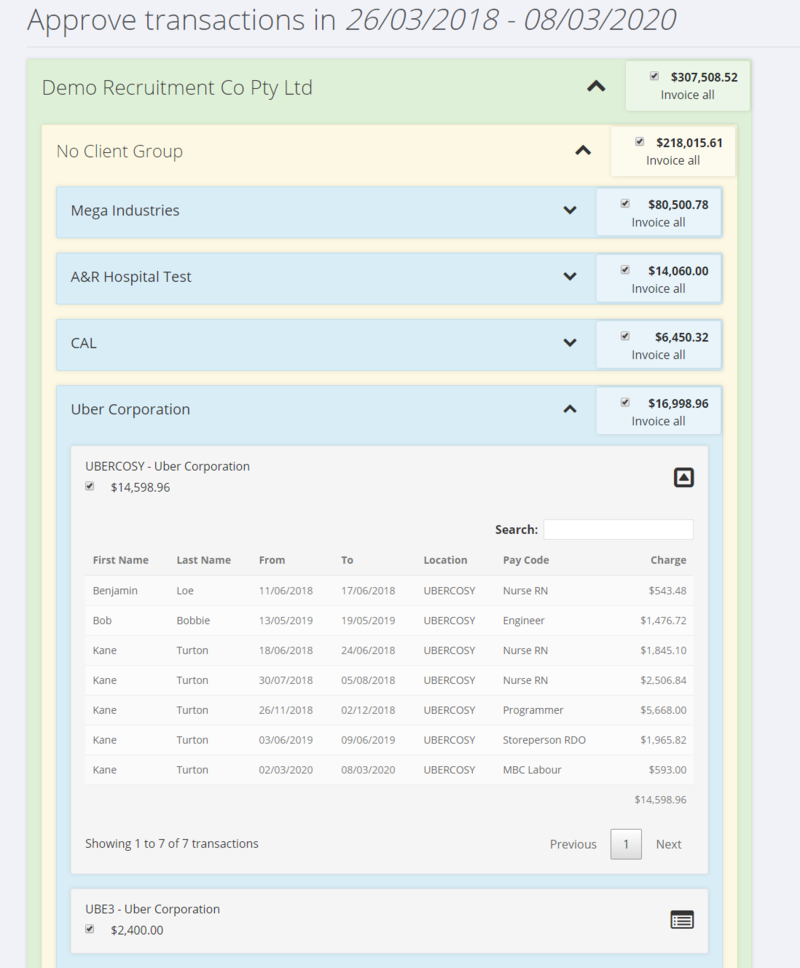
By clicking on the arrow down icon you can split the draft invoices down to each level.
Client Group Level'
Client Level
Client Billing Location Level
Draft Invoice Level


