In a nutshell: To pay an employee without a timesheet, open their order from Payroll > Orders, choose the week ending, click Enter Hours, type the quantities and click Submit Hours. The pay then waits in Open Batches.
Applies to: Australia
About
Most pays come from timesheets or an hours import. Enter Hours is for the times you need to key a pay yourself: a missed shift, an allowance, a one-off payment, or a second pay for someone already paid that week.
A pay is always entered against an order, because the order carries the employee, the client and the pay code with its rates.
Entering hours does not pay anyone. It creates pay rows, which you then process from Payroll > Open Batches. See Processing a Pay Batch.
Quick Reference
| Part of the screen | What it does |
|---|---|
| Week Ending | The week the pay belongs to |
| Pay Frequency | Weekly, Fortnightly or Four Weekly |
| Adjustment Pay | Marks the pay as an adjustment to an earlier pay |
| Enter Hours | Opens the grid of pay code items |
| Quantity | The hours or units for each pay code item |
| No Pay | Enters the hours without paying the employee for them |
| No Charge | Enters the hours without charging the client for them |
| Edit Pay & Charge | Lets you change the pay and charge rate for this pay only |
| Use rate version rates | Uses the rate version that applies to the week, where there is one |
| Submit Hours | Saves the pay rows |
Enter a pay
- Go to Payroll > Orders. You can also click Pay Employee in the main menu and then View Orders.
- Find the employee's order and click it. Use the Employees list or Search to narrow the orders.
- Choose the Week Ending and check the Pay Frequency.
- Click Enter Hours.
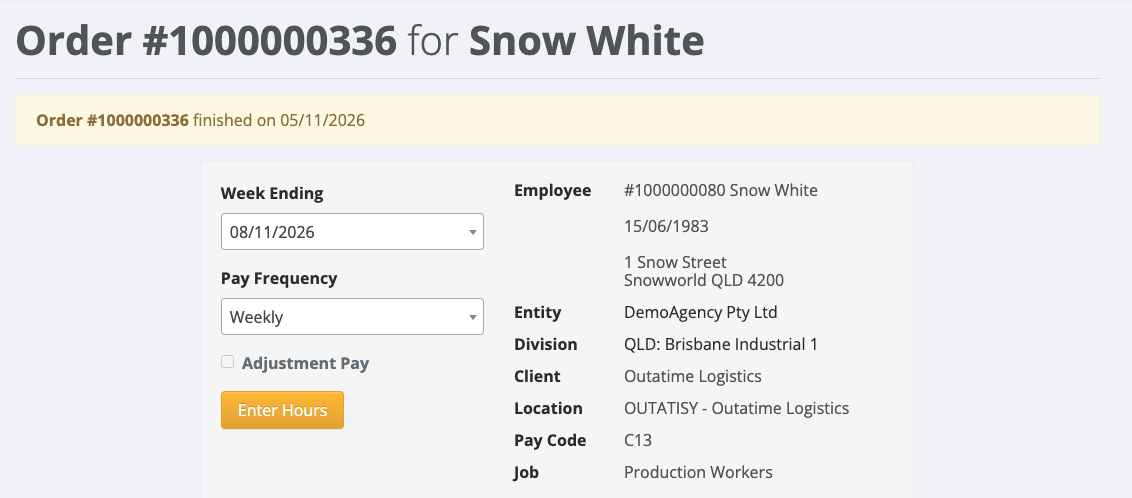
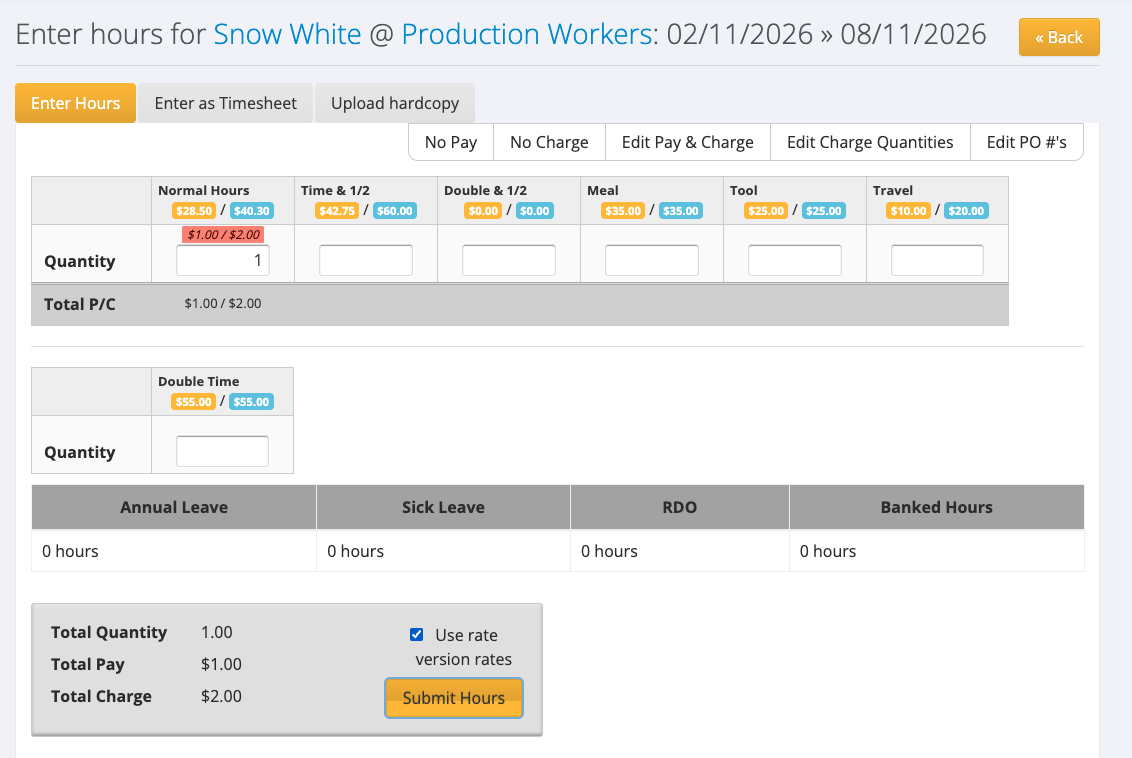
- The grid shows each pay code item on the order's pay code, with its pay rate and charge rate. Type the hours or units in Quantity under each item you are paying.
- Check Total Quantity, Total Pay and Total Charge at the bottom.
- Click Submit Hours.
A message confirms the hours were added, with a View Batch link. The pay is now in Payroll > Open Batches under that pay period.
If a rate shown in red sits above a Quantity box, a rate version applies to that week and its rates will be used. See Rate Versions.
Change a pay you have entered
Open the same order and week ending again and click Enter Hours. If the pay has not been processed, the heading reads Edit entered hours and the quantities you entered are shown. Change them and click Submit Hours.
To delete the rows, or for finer control, use Payroll > Edit Pay Rows. See Editing and Deleting Pay Rows.
Pay an employee a second time in the same week
Nothing stops a second pay. This applies to salaried staff as well as anyone else.
- Make sure the first pay has been processed.
- Open the employee's order, choose the same Week Ending and click Enter Hours.
- PinvoiceR shows a notice that the employee "has already been paid" an amount "this period". This is a reminder, not a block.
- Enter the quantities for the second pay and click Submit Hours.
- Process the new pay from Payroll > Open Batches.
Because nothing stops it, check the notice carefully so you do not pay the same hours twice by mistake.
If the employee has a deduction set to Only the first pay in each instance of this employee's pay cycle, it is not taken from the second pay. See Deductions.
No Pay and No Charge
No Pay and No Charge record hours that are not paid, or not charged to the client. A pay made up only of unpaid hours has a net pay of $0.00. A batch like that has nothing to put in a bank file, so it will not get a pay date from the bank file download. If you find a batch like this stuck, raise a support ticket with the batch number.